Friday, 18 March 2016

Home made almond milk


I have been thinking and playing with an idea of making my own home made almond milk for quite a while, and finally I have decided to give it a try.
I have tested some almond milk on the market. Many stores widely sell almond milk in the boxes which has 2-8% almonds in it! Can you imagine it? Are you comfortable with an idea of buying and drinking something that is almost a water on its own? To be honest I have not tried ones that are in the boxes but have tested the one in glass and plastic bottles, which are home made and contain about 20% almonds. I have purchased this at my local health shop and it actually tasted good. The only downfall was the very high cost considering only getting 0,5l bottle and I thought to myself I had to make this very soon.
On top of being just 2-8% almonds, the boxed almond milk contains a lot of harmful ingredients, such as carrageenan and also colorants and other unwanted preservatives and additives.

After seeing this in the shops I was quite disappointed and disgusted and told myself I will not be buying what most of the shops, even health stores are selling.

So, one day I decided to give this a go and finally made my own home made, delicious almond milk. I had bought some almonds previously, so I had them in stock.

Firstly, you need to soak the almonds before hand. There are some powerful blenders where you do not need to do it, but I would suggest to soak them. There are many benefits of soaking, it is better for your digestion and make almonds more bio-available to your system. 
I soaked mine for 2 days, but 1 day should be enough. After this time, the skin from raw almonds was coming off almost by itself. I removed all the skins and was ready to proceed.

Here is the recipe:

Home made almond milk


Ingredients
  • 1 cup raw almonds
  • 2- 3 cups water (or more, depending on how you wish your consistency to be)
  • 1/2 tsp vanilla powder or 1 tsp vanilla extract
  • pinch salt
  • 2 tbsp honey or maple syrup 

Place soaked almonds (without the skin) in the blender. Add vanilla, pinch salt and sweetener of your choice. 

Blend on high until almonds are completely crushed and blended well. 

Pour this through the sieve or even better, use a nut milk bag if you have one. I used cotton kitchen cloth, and it worked well. 

Squeeze the almond remains to get most of your liquid out.

The almonds remains can be used for baked or raw vegan dessert or crackers. Store in the fridge for up to 3 days.

The recipe will yield about 800ml of almond milk. Keep in the fridge and use within 4 days.

Enjoy !


Monday, 8 February 2016

Recipe: Rich fruit smoothie bowl

There is so much healthy food inspiration out there, especially on social media like Instagram. I too, got inspired with creating a first real fruit smoothie bowl. You can see hundreds of variations and colors of all pallets on the photos, topped with various fruits, often the tropical ones and other super healthy toppings, like cacao, nuts and seeds. So one day, I just decided to recreate one of these awesome bowls myself.


Firstly, to explain what exactly the fruit bowl is. As you know, fruit and veg smoothies and juices have been  staples for quite some time and smoothie bowl  is a newer kid on the block.

Smoothies are thicker versions of juices, where fiber is still present as contrary to juices where it is normally removed and only water part of veg and fruit is present. 

Fruit smoothie bowl can be created just from the fruit, which I personally do not prefer but I still, like with smoothies, like to include greens as well.

Difference between smoothies and smoothie bowls are very minimal, as for the composition. What is different is the thicker texture of a smoothie bowl thanks to extras like nut butters, protein powders and ice cubes especially, limiting the water part, which makes it thicker and not suitable for drinking. It is actually even better to use frozen fruits for this purpose. 

As a base I prefer starting with some greens, like baby spinach and/or mint. Then you can add any fruits but the soft ones are the best. You can add bananas, kiwi, peach, pear, mango, papaya, granadilla, any berries .. the popular one these days is colorful dragon fruit. After adding fruit you can put in all your extras, like nut butter, various protein powders or shake, green matcha powder, mesquite or maca, and also various seeds and cacao. The last step is to add very little water or 3-4 big ice cubes instead. Blend this well in your blender on high speed, preferably in high power blender. Now, here comes the best part, decorating your smoothie bowl. You can get creative here. Use various seeds, nuts, cut up fruit in different sizes and shapes for your toppings, even other object that will make your bowl look interesting. This part is important if you want to post your creation on your social media like Instagram. But I say, do it anyway, just for yourself. 

Be inspired with these 2 delicious recipes below:

Mango and kiwi smoothie bowl


Ingredients:
  • 1x mango, cut
  • 1x kiwi, cut
  •  pinch ginger
  • 1/2 cup mint leaves
  • 1 tbsp hemp seeds/hemp seed powder
  • 1 tbsp macadamia nut butter (can be other nut butter as well)
  • 2 tbsp vanilla chai protein shake (can be substituted with other protein powder) 
  • 4 ice cubes (plus little water, if necessary or depending on your desired thickness)

Place all ingredients in your blender and blend all on high until smooth.
Serve in a bowl and top with goji berries, flax seeds, raisins, coconut shavings, chia seeds and granadilla or any other topics of your choice.

This makes 2 medium size bowls.


Banana, pear and blueberries smoothie bowl 


Ingredients:
  • 2 bananas
  • 1 kiwi
  • 1/2 cup blueberries
  • 2 pears
  • 1/2 cup mint
  • 2 tbsp vegan vanilla chai protein powder (you can substitute)
  • 2 tbsp hemp seeds or hemp seed powder
  • 1 tbsp macadamia nut butter
  • 1 tbsp sunflower seeds
  • 5 ice cubes (plus 1/2 cup water if needed) 

Place all ingredients in your blender and blend all on high until smooth.
Pour in the bowl and decorate with granadilla, chia and goji seeds, sliced plum or blueberries.

 This makes 2 medium size bowls.


Enjoy!

Sunday, 3 January 2016

Recipe: Simple and tasty 4 ingredients cacao muffins

I have done this recipe for couple of times and I have always enjoyed it, even though it is very easy and simple to put together. I love everything chocolate so cacao in this recipe is my favorite taste. All flavors from the ingredients come nicely together and they taste great. This time, I have enriched the recipe with couple of additional ingredients. You can completely leave them out as this is very taste just as is, with 4 ingredients total.

So, here it is:

4 ingredients cacao muffins


Ingredients:
  • 4 tbsp cacao powder
  • 3/4 cup peanut butter
  • 2 large bananas 
  • 5 tbsp maple syrup
Extras:
  • 3 tbsp almond meal or almond flour
  • 1 tbsp maca powder
  • 1/2 tsp baking powder
  • 1 tbsp chia seeds

In your food processor or even by hand with the fork, start mixing your bananas. If you are using the food processor do not over process, the mixture should not be runny. 

Add peanut butter, then cacao powder and maple syrup.

Mix to incorporate the ingredients well.

Finally add the extras, if you are using them.

When mixed, the mixture should still be slightly thick (not runny).

Pour mixture into muffin trays. You can fill them up as they will not rise. 

Bake at 170-180ÂșC for about 20-30 minutes, depending on your oven. It can be even a bit longer.

After being baked, muffins should be nice and goey and not dry.

Makes about 8 medium muffins.


This recipe will have success with anyone, adults and kids as well.

Enjoy!


Wednesday, 9 December 2015

SUN and what you need to know

source: wallpaperscraft.com
In every magazine today, you will find numerous articles about how to behave and protect yourself in the sun, especially in the summer months. Every time I read one, I am thinking all that info is not accurate at all and actually a lot of those things are misleading in order for the industry to make money.

Vitamin D reduces the risk 
of getting a cancer by calcium
 absorption, increasing the cell 
death, reducing metastasis and 
formation of new blood vessels.
 
Against the popular belief, the sun is very important for you, if not essential. Without sun and the sunlight, nothing would exist and we would also die, due to the fact of having insufficient and important levels of vitamin D, especially D3 one. D3 is very important for overall wellbeing and health. Sunlight increases the levels of happiness as well. Vitamin D deficiency has been linked to cancer, diabetes, osteoporosis, IBS, multiple sclerosis and autism. It is also vital for immunity and fertility and protects against melanoma.
Vitamin D is not really a true vitamin as we do not need food to obtain it. When the sun´s UVB rays hit your skin, they are turned into vitamin D3 in your body by triggering a molecule called 7-dehydrocholesterol.
Vitamin D reduces the risk of getting a cancer by calcium absorption, increasing the cell death, reducing metastasis and formation of new blood vessels. There have been studies done on a direct connection between vitamin D deficiency and heart disease. If appropriate levels were met, breast cancer could be reduced by 50% and colon cancer by whopping 80%. Sun is also beneficial for relieving fibromyalgia pain.

Octyl methoxycinnamate 
is present in 90% of 
sunscreen brands.
 
You have surely heard how damaging sun rays are and how much sunscreen you have to apply. This is simply not true. It is a myth that sunscreen prevents cancer, purely promoted by the both cancer and sunscreen industry. Sunlight is very good for your, especially UVB rays - and sunscreens filter out UVB ! This is caused by the ingredient called octyl methoxycinnamate. This ingredient has been shown to kill mouse cells even at the low doses. And more so, when it was shown to be toxic when exposed to the sun. This ingredient is present in 90% of sunscreen brands.
There are also other toxic chemicals present in the sunscreen products, you should avoid, because they are damaging your health:
  • dioxybenzone also know as benzophenone-8 amongst others - linked to cancer, endocrine disruption, developmental and reproductive toxicity and organ system toxicity
  • oxybenzone known also as benzophenone-3, phenylmethanone or methsoxyphenol amongst others - causes cellular level changes, is an endocrine disruptor and allergen. This ingredient is also behind the increased rates for melanoma
  • octisalate know also as ethylhexyl salicylate and benzoic acid amongst others - linked to reproductive and developmental toxicity
  • homosalate - endocrine and hormone disruptor, inhancing the absorption of pesticides in the body, absorbs in the skin
  • octocrylene - can cause allergic skin reactions, irritate skin, eyes and lungs
  • avobenzone also known as butyl methoxydibenzoylmethane, 1,3-propanedione amongst others - degrades in the sun, resulting in the release of free radicals that may increase the risk for cancer
  • retinyl palmitate (a form of vitamin A) - when exposed to UV light, it creates free radicals and therefore may cause cancer, can be toxic for developing fetus in pregnant woman, linked to brain swelling, organ toxicity and cardiovascular disease
  • titanium dioxide - is a mineral and not chemical sunscreen, but some studies show, that it may be carcinogenic to humans. Studies on rats showed when powdered form was inhaled, it caused respiratory tract cancer. No conclusive tests showed toxicity when applied on human skin, so it is everyone´s decision whether they want to use it or not.

Many reports showed that NANO titanium dioxide and zinc oxide (both mineral sunscreens) had the ability to pass through skin and generating free radicals, causing the cell damage. It is therefore important to choose non-NANO titanium dioxide and zinc oxide with the particle sizes larger than 100nm, so read the product labels.
UVB rays are the ones responsible for making you turn pink or red in the sun, also known as sunburn. UVA rays are the nasty ones responsible for getting down into the underlying layers of skin causing wrinkling, aging, and in some cases skin cancer.  Choose a sunscreen that protects from both UVB and UVA (also referred to as “broad spectrum”. Zinc Oxide and Titanium Dioxide both provide broad spectrum protection. My personal opinion is to used products with only non-NANO zinc oxide (or micronized). Zinc oxide products should be swiped on the skin and not rubbed in, as it works on the surface of the skin.

  Choose products with 
non-NANO titanium dioxide
and zinc oxide with the
particle sizes larger than 100nm.
 
It is not said by this that we must be baking in the sun for hours, without any protection. It is essential though that you should get direct sunlight and be exposed to the sun for at least 25 minutes each day without any protection. This is best done when UVB rays are absorbed by the body, between 10,00-15,00. If you are darker skinned, you will probably need more than that. After this period and when tanning for long periods, you should then apply natural sunscreen and reapply after swimming and heavy sweating. Be careful again, as not all natural sunscreens are free of above mentioned toxic chemicals, so read the labels. To protect your skin you can also use one of these: coconut oil, carrot oil, raspberry seed oil and various oil mixtures. These are all available in health stores or online health shops. Aloe vera gel is also very good.

If you are new with this, you should start the sun exposure for about 10 minutes, without any protection. You can increase this slightly each time when you are in the sun, to up to 30-40 minutes depending on your skin type, until slightly red (not burnt! ). This will prevent the burning the next time by the protection you already have. Darker skin will need more sunlight because they synthesize vitamin D more slowly. When exposed to the sun you should bare at least 40% of your skin (like your arms and legs). Do not shower for about 90 minutes after you have been exposed to the sun. This will cause vitamin D being properly absorbed in the body.

  To protect your skin
you can also use one of these:
coconut oil, carrot oil, raspberry 
 seed oil and various oil mixtures.  
  
It is important to note, that in order to prevent early burning, you need to have and adequate levels of vitamins and antioxidants, present in fruits and vegetables as well as B vitamins levels. These will all prevent sunburn. It is enough for you to obtain vitamin D from the sun alone, but in winter when UVB rays are much less or not present at all, you will probably need a good quality vitamin D3 supplement. It is a good idea to supplement even though replacing sun with vitamin D supplements may not be enough for health as sunshine activates nitric oxide, which dilates blood vessels to reduce blood pressure and by this lowers the risk of heart attack and stroke.   

Sunshine and vitamin D is particularly important for children, where high percentage of sick children are vitamin D deficient, as well as older adults with low levels of vitamin D have an increased risk of death. Researches found that children with low levels of vitamin D had increased dental cavities occurrence. In another research, higher vitamin D levels were shown to have decreased knee cartilage loss in patients with knee osteoarthritis.

  Sunshine and vitamin D is 
particularly important for children,
where high percentage of sick 
children are vitamin D deficient.
 
With a vitamin D you cannot overdose, if you get more sun than needed. Your body will automatically produce just the right amount you need.

The only wavelength that makes your body produce vitamin D are UVB rays, when they hit the exposed skin. It is important to note that UVB rays are available only in summer (US, Europe), but it also depends on your location when UVB rays will penetrate the atmosphere when the sun is above an angle of about 50 degrees from the horizon, even in summer. The best is to locate your latitude and longitude and check on Google Earth how many days of the year there are of UVB rays for your location. The sun must be above 50 degrees from the horizon. There is a good app for Apple devices that you could use, called D Minder, which will make the calculations for you. So, remember it is best to expose your skin to these beneficial UVB rays at these specific times and not other times where UVA rays can harm your skin and health.

SPF measures the amount of sunlight it takes to make your skin red while using protection vs the amount of sunlight it takes to make your skin red when you do not have sun protection on. SPF 30 is not twice as much protection as SPF 15, but only small percentage more. SPF 15 will protect you from 93% rays, SPF 30 against 97%. So, do not be fooled by high SPF ratings on the products.

When tanning, you want to choose the best and healthiest option out there, just as for your regular skincare and makeup. The best one to choose is a mineral organic sunscreen. Mineral sunscreens reflect the sun´s rays away from the skin contrary to conventional products, which are firstly absorbed in the skin with all the toxins and chemicals and secondly, the sun´s rays are being absorbed when they hit the skin. You want to choose a product without any chemicals (see the list above). These may cause or have been linked to skin damage, various cancers, hormonal imbalance and birth defects. Natural sunscreens use plant based oils with similar properties as your own sebum. They help your skin breathe instead of clogging it with petroleum-based products. Harsh chemicals can cause allergies as well, therefore it is best for the health of your child especially to choose organic products, which are best for their sensitive skin. 

  Mineral sunscreens reflect the 
sun´s rays away from the skin 
contrary to conventional products. 
 
Organic sunscreens also work immediately, as they do not need to absorb into the skin first. The SPF that is in organic products are obtained from minerals like zinc oxide and also titanium dioxide (as I have explained above). There are different oils used in the products for the best SPF protection. Be sure again, to check the ingredient list for unwanted chemicals by reading the product labels. As shown, there are a lot of organic products, sunscreen not excluding, containing phenoxyethanol and alcohol as well.

When looking for good, safe and effective organic sunscreen product, you want to use something with the best ingredients possible. Herbs are one of these ingredients you can look out in your sunscreen products:
  • green tea - contains powerful and beneficial antioxidant that protects the cells on the inside but has been shown to prevent sunburn when applied on the skin as well. Drinking 2 or more cups daily, showed 65% lower risk in skin cancer
  • various oils - coconut, sesame, olive, broccoli seed oil, borage, evening primrose, avocado and tea tree oil. In a study sesame oil has been show to block 30% of UV rays
  • vitamin E - is an antioxidant and the natural forms such as alpha-tocopherol and tocotrienol protected the skin, so it showed less damage after sun exposure, with less roughness, facial lines and wrinkels
  • krameira triandra root extract - this extract was found in studies to be even more protective than green tea
  • coenzyme Q10 - powerful antioxidant that counteracts damaging free radical activity caused by the sun and could provide enhanced protection from inflammation and premature aging, when used in the skin products
  • golden serpent fern - is a herb, that works as an antioxidant, protecting DNA and skin from UV damage, beneficial especially for sensitive skin
  • helichrysum flowers - protect the skin from damaging rays, with anti-inflammatory and regenerative qualities
  • rosemary - is also rich in antioxidants and protects from free radical damage and helps tame inflammation
  • lavender - is widely used in natural sunscreens, it has a lovely scent in addition to important shield from free radicals as well as protections against cancerous changes

Lastly but not the least, I would like to share with you some links for the online stores where you can order natural and organic products and sunscreens too:

South Africa

http://www.faithful-to-nature.co.za/

http://www.wellnesswarehouse.com/

https://www.ecostoreonline.co.za/ 


http://www.pureskincare.co.za/

http://mioja.co.za/


Europe

http://www.naturisimo.com/

https://www.lovelula.com/

https://www.ecco-verde.com/


Slovakia

http://www.bioshop.sk/

http://www.bioterra.sk/

http://www.ekomarket.sk/


US and Canada

http://www.beautycounter.com/

https://thrivemarket.com/

http://www.amazon.com/s/ref=nb_sb_noss?url=search-alias%3Dbeauty&field-keywords=organic+

http://www.ecodivabeauty.com/CA/  


Australia 

https://www.nourishedlife.com.au/ 

http://www.iamnaturalstore.com.au/


sources: 
truthaboutcancer.com
mercola.com
safemama.com
faithful-to-nature.co.za
safecosmetics.org
ewg.org
annemariegianni.com


Friday, 27 November 2015

Recipe: Chia seed pudding with almond milk

Today, I would like to share with you what I normally eat for breakfast. In today´s world there are a lot of possibilities what one can have and enjoy as their first meal in a day.

Eating breakfast, as we know, is very important. But is it really? Study suggest, that when we skip or rather postpone our first meal to later morning or at least 2-4hours, our bodies will burn more fat this way.

This is called intermittent fasting, and it means, that there are at least 14hrs between our last meal in a day and breakfast in the morning. This would practically mean, that we have dinner at 6pm latest and breakfast at 8am in the morning, which in not so bad. This period can be prolonged though, and you can have your first meal even between 10-12am, or later. This also does not mean we will eat more than what we normally do, but would enjoy the same or even less food as usual. Intermittent fasting comes in different methods, where you can fast to up to 36hrs with very few to no calories, or eat very few calories in one day and normal the next day.

Here you can see more detailed info about various methods:

If you look at this closely, each of us fast every single day, without even realizing it. We fast when we sleep, and intermittent fasting is only about prolonging this period of sleep, and means we will just skip a meal or two. This can be done without much effort. The good method and quite easy one to follow and stick to is the one explained above, where you will have about 14-16hrs fast or a break between your last and first meal of the day. There is a reason why we call breakfast breakfast after all, which literally means break - fast. So we actually break our fast with the first morning meal. 

Intermittent fasting has a lot of benefits, it helps to loose weight and belly fat, improves body composition and helps you to feel better overall. Intermittent fasting changes the function of cells, so when we fast the waste material from the cells is being removed, this is called autophagy. Insulin levels drop significantly whereas the human growth hormone may increase, both factors make it easier to burn fat. It is also beneficial for lowering the risk of diabetes. Fasting can also reduce oxidative stress and inflammation in the body and is effective for your heart and brain, preventing cancer and good for stabilizing blood pressure and cholesterol levels. And finally it has been proven to prolong one´s life making it a great tool for anti-aging rewards.

So, what do I typically eat for breakfast ? This may vary, but i do alternate between having a green smoothie, a bowl of healthy porridge, freshly cut up fruit, cooked oats and a chia seed pudding.
I would always try to incorporate protein, healthy fats and carbs into my breakfast. This would mean I will add nuts, seeds or nut butters for healthy fats and protein. Wallnuts, almonds and macadamia nuts are great options, as well as pumpkin, sesame and sunflower seeds. Hemp seeds are especially good for their high protein content as well as chia for their omega 3´s benefits. As for the fruit, I try to eat various kinds of different colors for the different benefits, mineral and vitamins content.

Green smoothies are a great way to start your day. Mine are usually full of greens like kale, spinach, coriander, fresh mint and other greens, as well as hemp seed powder for protein and sometimes a piece of avocado, which is great as a healthy fat addition to my smoothies. I will usually add a piece of fruit per one portion of smoothie. This would be one apple or pear, 1 kiwi, 1 banana or 1/4 or pineapple. I will add some extras, like baobab powder - which is very good source of calcium and fiber as well as a good source of prebiotic. Sometimes I will add chia seeds too or mesquite powder with its sweet caramel flavor and high protein content.

I eat my oats cooked, and finish it with a few raisins, 1 tsp of cinnamon, couple of dates or grated apple. There is a lot of ways how you can eat your oats, you can add coconut or almond milk in the pot while cooking as well as few raisins and dates. You can soaked your oats in plant milk overnight as well, either plain or with some vanilla extract or powder, chia seeds, grated apple or mashed banana and strawberries.

My porridge consist of gluten free grains, sometimes it is a mixture or I will use millet, amaranth, buckwheat or spelt flakes. I will mix this with some warm rice or almond milk and add some nuts and seeds. My favorite are chia seeds and goji berries. I will add some shredded coconut if I feel like it. Other great options for porridge are cooked whole buckwheat or quinoa.

Fresh fruit is really a good option for breakfast and is best enjoyed and absorbed by the body when eaten on an empty stomach first thing in the morning or before lunch. It should not be mixed with other foods, especially if couple of portions of fruit is being used. This is due to the fact that it takes only 2-3hrs for fruit to digest in the stomach and if its eaten with some other food it will ferment there until the other food has been digested. My favorite fruits are bananas, pineapple, papaya, all sorts of berries, guavas, grapes and kiwi.
If you do not like to eat a lot of cut up fruit, the other option is to blend it into a nice fruit smoothie bowl and enjoy it this way.

Last but not least, is my favorite chia seed pudding which I really like. Usually I will soak chia seeds overnight with some rice or almond milk, bit of vanilla powder and shredded coconut. So, when I wake up, I will take this out of the fridge and mix well, decorate this with some coconut chips, a few blueberries or half banana (see the note about fruit above) and a dash of sweetener, preferably the healthier option.


Let me share a simple recipe with you here:

Chia seed pudding with almond milk


Ingredients:

  • 1 tbsp chia seeds (2 tbsp if you like it thicker)
  • 1 tsp baobab or/and maca powder (you can add any superfood powders)
  • 1 tbsp dried goji berries
  • 2 tbsp shredded coconut
  • 200 ml almond milk

This serves one portion.

Place all ingredients in a glass and mix well. 

Let sit in the fridge overnight.

Take out in the morning, mix again, add more milk, if its too thick.

Sprinkle with some crushed nuts, cacao powder, coconut chips and couple of blueberries or half banana. 

Sweeten to taste if you need a little sweetness to it.

Enjoy !


source: 
authoritynutrition.com


Monday, 23 November 2015

Recipe: Oat squares with chia jam

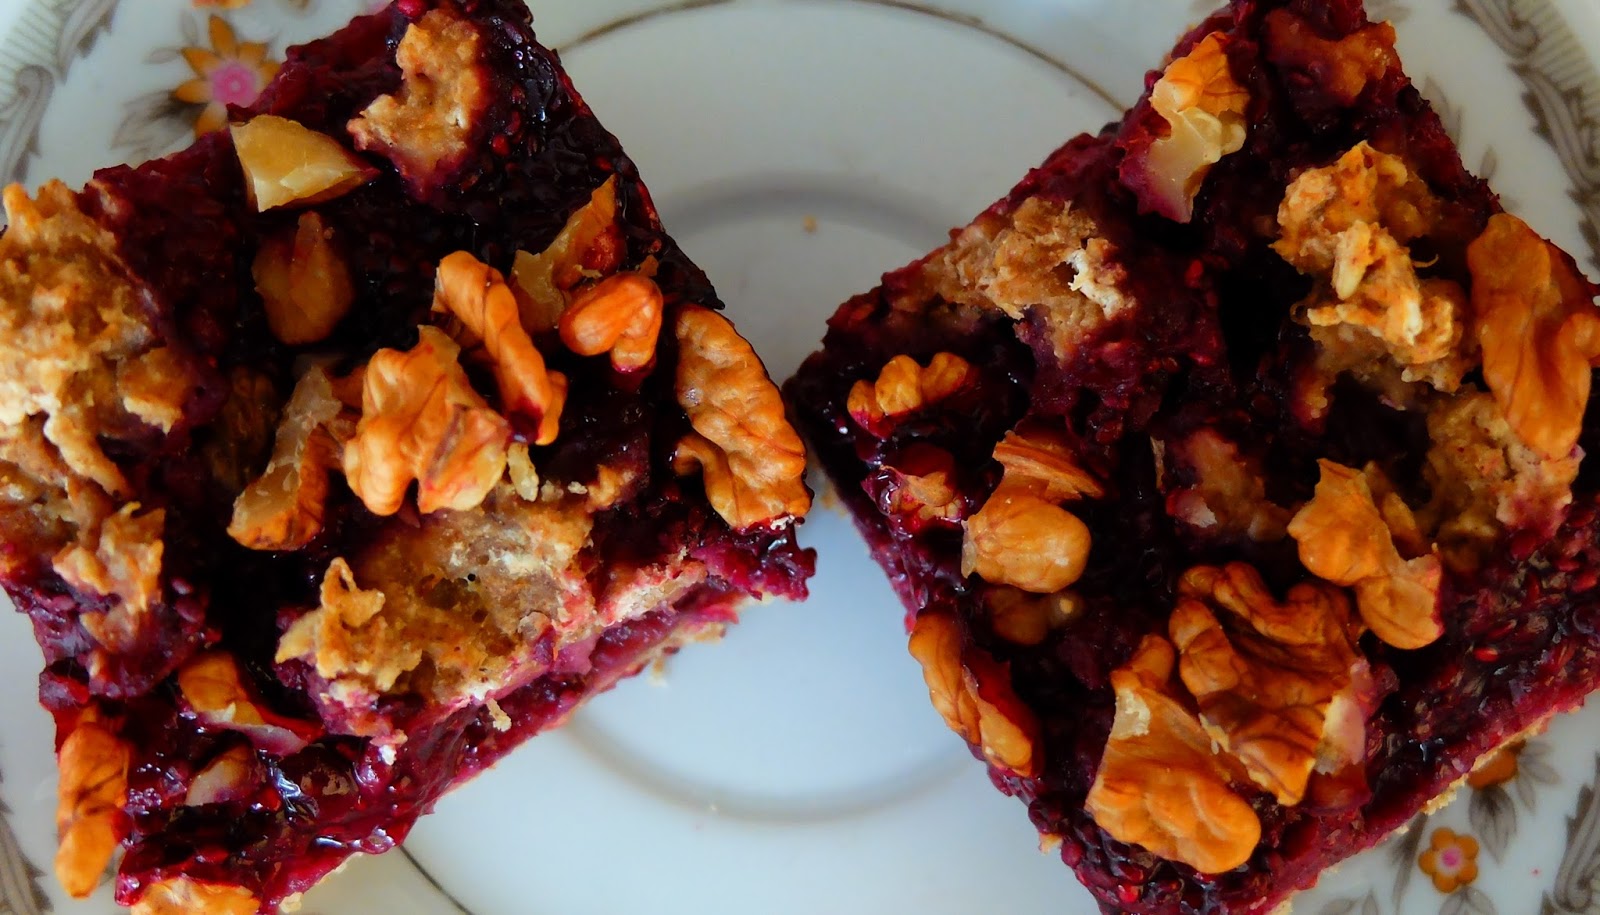
Today, I am sharing with you this yummy oat chia jam squares recipe. They are easy to prepare, tasty and not overly sweet. The base of these squares are made of oats and bananas. We will do without flour or oil in this recipe. I have used a bit of rice and spelt flour instead of ground oats in the original recipe. The top layer is made from chia seeds and berries. Original recipe calls for frozen raspberries, but I used frozen berry mix.
Chia seeds are one of the superfoods and come from the desert plan called Salvia hispanica, grown in Mexico, Bolivia and Argentina. They have mild, nutty flavor, making them easy to add to different foods and beverages. They are rich in omega 3´s fatty acids and also contain a lot of protein, fiber and minerals. The seeds are dissolvable, absorbing up to 12 times their weight in liquid when soaked. While soaking, the seeds develop a gluey gel-like coating that gives chia-based beverages and liquid foods a distinctive texture. Chia seeds should always be put into a liquid based mixture (water, plant milks, smoothies, green drinks, raw or baked bars and cookies, breakfast oatmeal) and never eaten dry on its own. Either whole or ground chia can be used in the food preparation. It is a good replacement for an egg and oil in cakes in vegan recipes in addition of providing great health benefits from their nutrient content.


Oat squares with chia jam
 
Ingredients for chia jam:
  • 300 g raspeberries (frozen), I used 400 g frozen berry mix and about 100 g fresh blueberries
  • 3 tbsp chia seeds
  • sweetener according to taste (I used 1 tbsp maple syrup)
 
 Ingredients for oat square base:
  • 2 soft bananas
  • 100 g whole oats
  • 100 g ground oats (here I used 1/2 spelt and 1/2 rice flour with 1 tbsp corn flour)
  • 1 tsp cinnamon
  • 1 tsp baking powder
  • handful chopped wallnuts
  • sweetener of your choice (I used 2 tbsp maple syrup)


First, prepare the chia jam. Place your berries in the pot on the stove, with a little water, stirring regularly. Cook this until very soft. Set aside, stirring in chia seeds and sweetener of your choice. Let it cool for an hour.

Prepare the oat base by mixing bananas (feel free to do it with your hand mixer, or by hand as I did), adding oats, flour (if using), cinnamon, baking powder and sweetener to taste.

Pour 3/4 of the mixture into the prepared baking tray. You can press it down a little bit. I used a bakeware measured 30 x 21 cm and wiped it out with a light coating of coconut oil. You can also line your tray with a piece of parchment (baking) paper. Pour chia jam on the oat base and sprinkle the remaining mixture and crushed wallnuts on top.

Bake at 180 °C for 30-40 minutes.

Take out, let it cool and enjoy. It is very tasty on its own, but you can revamp it with some whipped coconut cream.

1pc: 124 cal, 3g protein, 21g carbohydrates, from which 3g is fiber, 3g fat


recipe adapted from fitcult.refresher.sk

Thursday, 19 November 2015

Recipe: Antioxidant energy coconut cacao balls

Eating chocolate has always been a favorite of mine. I love everything chocolate and mix and try it in different recipes. Few years back, however, I switched to eating dark (70% and up) chocolate. When trying and making different recipes I try to use cacao powder or organic cocoa powder.

Legally speaking there is no real difference between cocoa and cacao. In practice however, cocoa usually refers to products suitable for hot chocolate drinks or some baking recipes, whilst cacao refers to minimally processed raw cacao beans, powder, nibs, paste and butter. The difference between them is in the way of processing.

therealfoods.co.uk

The cacao is a fruit tree, also known as Theobroma Cacao. It produces fruits called cacao pods, which are cracked-open to release a cacao bean. Cacao trees grow in the Amazon Basin, Orinoco River Basin, Ghana, Phillipines, Brazil, Papua New Guinea, Ecuador, Togo and a few Carribean islands.

Raw cacao powder is high in antioxidants, it has 20 times the antioxidant levels of blueberries and 3x more than in green tea. One of nature´s highest dietary sources of magnesium, cacao beans are also rich in iron and an excellent source of dietary fiber. They are also full of good fat, carbohydrates, protein, polyphenols like flavonoids that are antioxidants, minerals like calcium, sulfur, copper, zinc and potassium, oleic acid which is a heart-healthy essential monounsaturated fat, fiber and vitamins E, B1, B2, B3, B5 and B9.

A single cacao bean contains 54% fat (that is the cacao butter), 31% carbohydrates (mainly fibre with a tiny amount of sugars), 11% protein (including arginine, glutamine and leucine), 3% polyphenols (flavonoids and proanthocyanidins) and less than 1% trace minerals including magnesium, iron, copper and phosphorus, as mentioned above.


COCOA

Usually, cacao beans are heated at a high temperature which makes it easier to remove the nibs from the husks. This process is called winnowing. So when roasted, the cacao nibs are separated out. These are then ground to a liquor (paste) consisting of cacao mass and cacao butter. After this, it is pressed, to remove some butter content. The pressed solid result is ground again to make into cocoa powder.

Cocoa can be also processed further by alkalizing it which increases its pH and mellows the flavor. This is know as dutch-processed cocoa powder. Cocoa/cacao is naturally acidic, and bitter in taste, so to neutralize its acidity it is washed in potassium solution. This results in milder flavor and taste, is sweeter and richer in color, therefore more suitable for making hot cocoa drinks and some baking recipes. There are few however, where Dutch cocoa cannot be used due to the lack of acidity, where the recipe calls for bicarbonate soda as an ingredient. There is no acidity in Dutch cocoa, so the cake would not rise. Dutch cocoa is usually used with baking powder which contains an acid to activate its bicarbonate. Dutch processing is an European style, therefore more used in European style recipes.


CACAO

Raw cacao powder is made by cold-pressing un-roasted cacao beans to remove the fat (cacao butter) without killing the living enzymes. It is therefore the least processed form, with most nutrients and minerals. With this method, cacao beans are not roasted but sun-dried instead, making it far more labour intensive to separate and therefore often more expensive. 

Raw cacao butter is generally pretty tasteless, but it is essential for making pure chocolate. But it is not the only way to make it. 

Raw cacao liquor also known as cacao paste is made by pressing the whole cacao bean and heating it (at low temperatures, below 42 degrees) to create a paste, instead of separating out the beans into cacao butter and powder. You can simply melt the liquor, add some sweeteners and flavors and you will end up with some delicious chocolate!

Since there is difference between cocoa and cacao powder, the chocolate as a result is therefore different as well. Dark chocolate made from raw cacao powder and cacao butter, or with pure cacao paste will be richer in taste and more nutritious than the chocolate made of processed cocoa powder. But it is important to note, that when buying chocolate, whether it is made from cocoa or raw cacao powder, it is best to choose dark varieties, with 70% cacao content or more. 

As for the processed cocoa powder, avoid varieties with added sugar together with other additives, especially those present in ready made hot chocolate powders. 

Regarding the health effects of the cacao and cocoa, there is not much difference, so choose pure unsweetened cocoa powder (processed) or Dutch-processed cocoa, if you prefer milder and sweeter taste, or richer more nutritious raw cacao powder, for better health benefits. Even though, raw cacao powder is made by cold-pressing, it is not completely raw, since it undergoes some kind of processing. To sum this all up, eating raw, unprocessed cacao beans has the most nutrients and offer the most health benefits.

With the further delay, I would like to share this delicious recipe with you:


Antioxidant energy cacao coconut balls


Ingredients:

  • 150 ml coconut oil
  • 100 gr cocoa/cacao powder
  • 100 gr raisins (soaked in warm water for 5-10mins)
  • 1/2 tsp pure vanilla powder or 1 tsp vanilla extract
  • 70 g maple syrup
  • 100 gr shredded coconut
  • 2 tbsp flax seed powder
  • 1 tbsp maca powder
  • 1 tbsp mesquite powder 
 
Superfood powders are optional in this recipe. Feel free to omit these or add anything else, just note, the balls will not have the exact same taste.

Start with melting the coconut oil. Add the cacao powder, shredded coconut, raisins, vanilla and maple syrup. Lastly, mix in the flax seed powder and the superfood powders, if using. 

The consistency will be soft, but when rolled into balls, it should hold together. If you prefer dryer texture, you can add more shredded coconut or cacao powder. It is not necessary though, as they will harden in the fridge.

Mix all the ingredients well and start forming 1 tsp sized ball. The size of the balls is up to, you can make them smaller or bigger, according to your liking. When I make this, I usually use 1 full tsp of the mixture and roll it into the ball. When done rolling, you should have about 30 pcs, less if you making bigger balls.

Sift some shredded coconut onto the plate and roll each ball in it.

Place the balls in the fridge to harden. It is best enjoyed when kept in the fridge. they will also last longer like this. If you prefer them softer, simply keep them on your counter at the room temperature.


Now, put this chocolate deliciousness straight into your mouth !


sources:
thesuperfoods.net 
realfoods.co.uk

recipe adapted from melissaambrosini.com